
Since VMware has provided an outstanding features of running OS on it without uninstalling your orignal OS. Plus you can install any OS running whether it is not SUPPORTED for PCs. I'm not going to show in this post that how you gonna install Mavericks using ISO. Since it is a very tricky way, there is already Pre Installed and configure VMware image. This is made by vanilla kernal. You can also update software within the Mac OS.
NOTE: I recommend you not to update it into higher version if you have an average PC.
Coming to our guide. I'm gonna show you how you can set up pre installed Mac OS X VMware image.
1) Requirement of Mac OS X Mavericks VMware image on Windows OS.
i). Make sure your system supports Hardware Virtualization technology (vt-x). It is mostly in every system nowadays. You have to enable it from BIOS. You can find it either in Advance Bios Features Tab or in Power tab.
- However, you can check within your windows if your computer supports Virtualization Technology.
- Download this tool.

If this shows yes, then your system supports virtualization technology.
For AMD users
- Download this tool.

- Download retail image. You can download from here. (4.81gb torrent file it is)
- Make sure you have latest VMware workstation. If not then download from here (https://my.vmware.com/web/vmware/downloads)
2) Extracting the downloaded zip and Opening the VMware image.
- Extract the downloaded retail image.

- Open OS X Mavericks folder.

NOTE: DO NOT OPEN THE IMAGE FILE NOW.
3) Setting up VMware image in VMware Workstation.
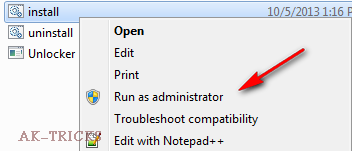
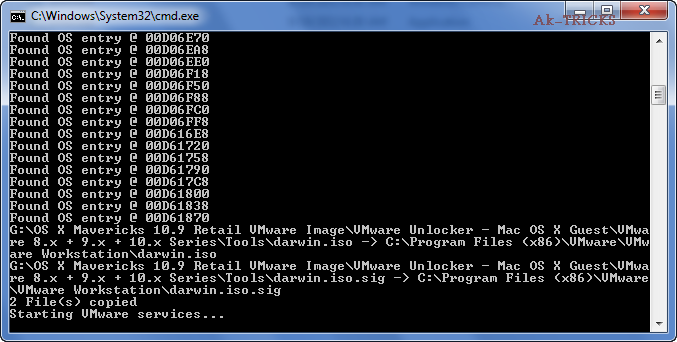
i) VMware unlocker installation.
Note: Sometimes after using unlocker in VMware workstation 10, the Apple Mac OS X guest support would not appear. But still the OS X guest will boot and work fine.

ii) How to use patch.
- The unlocker is available in the Image you have just downloaded.
- Goto \OS X Mavericks 10.9 Retail VMware Image\VMware Unlocker - Mac OS X Guest\VMware 8.x + 9.x + 10.x Series\VMware Workstation Unlocker - Windows
- Run it as Admin
iii) Open the image file
iv) Configuring VMware settings.
- Configuring the RAM. I recommend you to keep it half of your system's RAM. Since I've 4 Gb of RAM. So I'm keeping it to 2 Gb.

- Configuring Processors. Since I've Quad Core processor, i've chosen 2 processors and 2 cores per processor. Keep it half of your processors.

- Click on PLAY button and Mavericks will power up.

5) VMware tools for Mavericks on Windows OS
Sound and network works fine. You don't have to configure it anymore. If you want to change the screen resolution, VMware tools are the best solution for it. You can also change it to full screen.
Shared folder from Windows OS is also applicable after installing VMware tools.
- Mount the Drawin.iso present in the zip you have downloaded earlier (\OS X Mavericks 10.9 Retail VMware Image\VMware Unlocker - Mac OS X Guest\VMware 8.x + 9.x + 10.x Series\Tools)
- CD Drive will appear automatically on the screen of MAC. Click on Install VMware Tools(Note: If CD folder doesnt appear follow the below guide)
- Right click on the CD shown in the right bottom of VMware workstation. Click connect. it will show up.


- Right click on the CD shown in the right bottom of VMware workstation. Click connect. it will show up.
- Installing VMware tools. (If it asks for password, do not type anything and click continue)
Restart your Virtual Machine after installation is completed.
You will be able to change the resolution after that.
- Go to settings of virtual machine (make sure you go to the settings of OS X Mavericks) and add a Windows 7 host folder/partition. While setting up, you can select ‘Read Only’ if you like to protect the host data.

 -----x------x-------x------
This is all from here. Enjoy Mavericks. If you have any query, do not hesitate to ask. You can also mention your problems under this post in the comments area. Cheers!


.png)


.jpg)

0 comments:
Post a Comment