Thursday, December 11, 2014

Block Websites On Your Computer Without Software | Works In All Windows


Well,Blocking any web site on your pc becomes necessary once you really need to create it your pc. repeatedly somebody from your family or some irritating friend involves you and need to use your pc to surf net so he begin viewing videos on youtube or begin chatting on Facebook in spite of whether or not you're feeling it or not however you cant even raise them to depart.

Of course you ne'er wish that anyone use your pc for long-standing and keep victimisation your net whereas you only sit aside them to visualize what they're doing. you'll merely block the sites and stop them from gap in your system to urge obviate this drawback.

How to Block Websites on your Computer


There are certain Tricks to block a website from opening on your system :

Method 1 : Using Windows host file

For this method , you don’t require any additional software to be installed on your computer. All you need is a little bit knowledge and some basic file editing capability using notepad. Windows has this host file to map the ip addresses and host names of the host sites to your computer.
By using this trick you can make your computer to redirect again to your local machine instead of opening that host site. So for blocking any website using windows host file you need to follow some steps as given below :
Step 1 :Open  “C:\Windows\System32\drivers\etc” in the Windows search bar or navigate to the folder by clicking your way through Windows Explorer.
Step 2 :Now after reaching to this path you will see a file named Host. Right click on that file and click on open with notepad.
Step 3 :In Notepad, you will see several lines of text used for mapping purposes. Go to the last line of text (it should say something regarding a local host), now press enter to move the cursor to the end of the file then type  “127.0.0.1″  (without codes)and press the spacebar.
Step 4 :Now, type the specified address of the website you wish to block on the same line. For example, type “127.0.0.1 www.reddit.com” , “127.0.0.1 www.facebook.com” to block all these sites.


Step 5 :Now Save this file and ignore if you receive any messages showing  you warning about this modifications.
Step 6 :Go to your browser and verify that the site you want to block isn’t opening anymore.

Method 2 : Using control Panel

If you don’t wish to block sites using this host file or there is some problem in modifying that file , so you can do the same thing using another default function of windows i.e. Control Panel Parental Control.
For doing this , just follow a few steps given below and you are done :
Step 1 :Click on start button  > Go to control panel >  User accounts and Family safety > Set up parental control for any user.
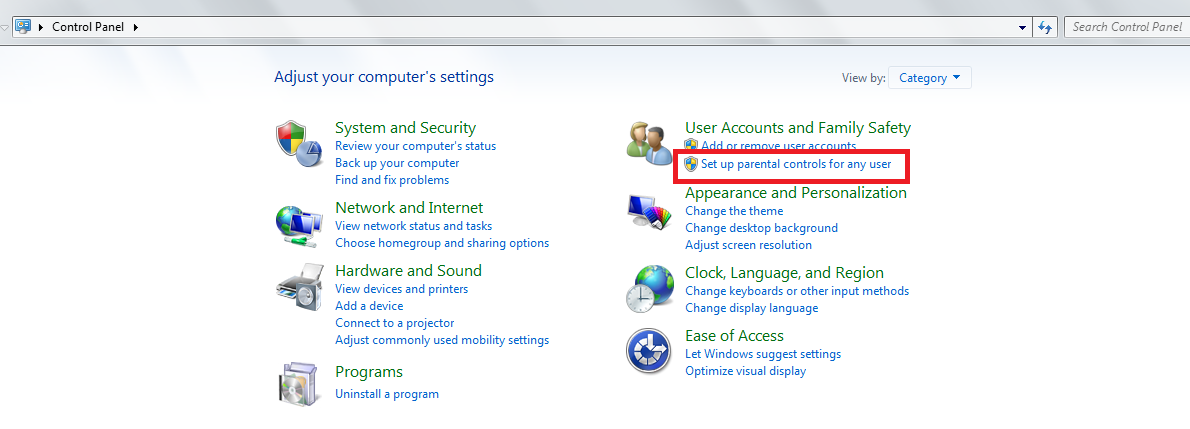
How to block websites
List of all the users in your system will be displayed .
Step 2 :Now select the account for which you want to set the web filter and then under parental controls ,  click ON.
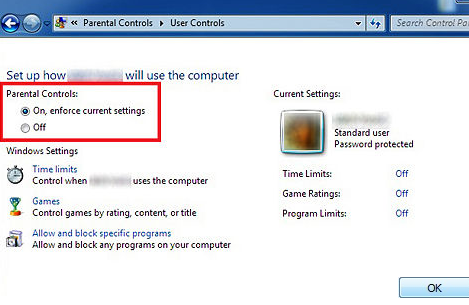
How to block websites
Step 3 :  Click on web filter.
Step 4 :  Click on Block some websites or contents .
Step 5  : Click on Edit the allow and block list.
Step 6 : In the Website address box, type the address for the website that you want to allow or block, and then click Allow or Block.
So now you have two methods to How to block websites On your Computer easily on Your Computer without having any problems. . .

Tuesday, December 9, 2014

Use VLC Player to Record Webcam Footage


I have use several packages for webcams however i ne'er satistfied with those software however currently fortunately one in each of the web’s most popular media players is here to help.

Most people use VLC as an area to look at video of any format however several most likely don’t realise that it also can act as a handy tool to record footage recorded by a digital camera.

VLC’s recording capability is fliped on and off simply with a special setting that forthwith forgets something that has been recorded and it may even be wont to turn your digital camera into a security camera. Below may be a piecemeal orient the way to use it.

Let's Start:
  1. Go to Media > Open Capture Device and then change the following three settings:
  • Set Capture Mode to DirectShow
  • Change Video device name to your webcam’s name
  • Adjust Audio device name to the microphone of choice, whether it be built into the webcam or an external one.
  1. Go to Advanced Options at the bottom of the window and change the Video input frame rate to 30 [anything lower results in poor quality footage]. To keep the software setting of the webcam, simply check the box next to Device properties.
  1. Next comes the chance to pick a capture method, of which there is two options.
  • Live feed: This allows you to view the video whilst it is being recorded and a headset should be used in order to eliminate audio feedback. Make sure to click the Record button when you want to start recording and it will be saved as an MP4 in the VLC directory [If the Record button is missing, go to View >Advanced Controls to enable it]. After all this is set up click Play at the bottom and it will get underway.
  • Direct save: If you don’t feel the need for headphones and are happy the camera is at the right angle then the direct save method will be right up your street. To get started click on the arrow next to Play and choose Convert, and once you’re done recording then press stop and everything that has been recorded will be stored. When the recording has been saved then choose the desired video format and go to Browse to find a place to save it.

Monday, December 8, 2014

Useful YouTube Keyboard Shortcuts

I’m certain you employ Youtube plenty, to look at OH, I don’t apprehend, funny home videos with babies or pets, strange and freaky occurrences, the newest music videos, tutorials, game walkthroughs etc, recorded events and talks, [insert something which will exist in video type here] etc.

Youtube
Watching Youtube videos is wont to most net users, that is why if you're an infatuated Youtube fan, you actually ought to comprehend these Youtube shortcuts. This quicktip can share with you shortcuts that offer you higher management over the videos you watch on Youtube.


1. Skipping Parts Of A Video

Almost every video you see starts with some random or irrelevant scene or introduction, so it’s only natural to hurry the video along by clicking on the time slider bar. Here’s how to do it without mouseclicks or the touchpad.
You can skip part of a video by pressing the numbers on your keyboard: skip videos at 10%, with button number 1, or 9 for 90%. The numbers do not refer to the minutes in the video, so if you want to start halfway, press 5 for 50%.
Youtube Shortcut
Note that this will not work when the video is already playing, although putting the video on pause rectifies this. Pressing button 0 on your keyboard will bring you back to minute 0:00 of the video.

2. Tab To Select Tool Options

The Tab key is useful if you don’t want to navigate with the mouse. In YouTube, the Tabkey lets the user highlight tool options such as those listed below. Just press Enter orSpace to execute.
  1. Watch Later
  2. Seek Bar – Press any number between 1 to 9 to skip parts of the video.
  3. Play or Pause
  4. Volume Control – Press up / down arrow keys to control.
  5. Change Quality – Press Enter or Space to execute, then press Tab key again to select quality.
  6. Large Player
  7. Small Player
Youtube Shortcut

3. Common YouTube Shortcuts

And lastly, here are a few more YouTube shortcuts for better control over the Youtube player.
ShortcutActions
SpacePlay / Pause
Go back 5 Seconds
Go forward 5 Seconds
Increase Volume
Decrease Volume
FFullscreen
EscExit Fullscreen

Seven Youtube Tricks

Youtube is beyond question one among the foremost in style video streaming sites out there. whether or not you would like to examine out some new music videos or notice the newest tutorials to use a package or widget, the primary place that typically pops to mind is YouTube. Despite it being very talked-about and powerful there ar some tricks and options that ar still not famed by most users.
This post intends to deliver tricks that may add a lot of dimension to your expertise on the YouTube platform, and permit you to get pleasure from a number of the little-known shortcuts, hacks and special options you\'ll use on Youtube.

1. Specific Start Time

If you want to share just a certain portion of a video with a user, you’ll notice that there is no official option to do this. Normally you have to inform others which minute they can pull to start from. Bet you didn’t know that there is a handy hack to send a link to a user or embed a certain portion of the YouTube video in your website. Skip the fluff and get to the good stuff.
Here is how it works. Consider the following Youtube Video URL:
After the URL link add #t=01m08s to set the starting point of the video at 1 minute and 8 seconds. Here is how it should look like:
To embed a portion of a YouTube video the process goes the same way. You simply have to add #t=01m08s to the embed code you get from the original video and paste it to your website.
Once a user plays the video, it will automatically start from the point you have specified in the embed code.

2. Auto Video Replay

There are certain times when you get obsessed with a Youtube video, whether it’s a really catchy song or a funny video. Isn’t it annoying to always have to hit replay everytime you near the end? Why not activate the looping feature?
The what now? Let’s use the same YouTube video. Just replace youtube with the textinfinitelooper in the URL and hit enter.
It will redirect you to another YouTube third-party platform where you are also provided with the option of looping selected portions of the video.

3. Auto High-Definition Video Play

Sometimes when you play a YouTube video the video quality has been set on default for you, usually at a lower quality video resolution. To prevent this from happening you can force the system to permanently play videos in an HD format.
Grab the extension called Magic Actions for Youtube available only for Google Chrome andFirefox. Enable the option Auto HD in the extension and select the video resolution you would like to be played automatically. You can also set the mouse wheel to scroll up (and down) the volume of the video.

4. Accurate Keyword Searching

There are a bajillion videos on Youtube so trying to find that specific Youtube video you want to watch is an adventure by itself. You might find yourself crawling through dozens of pages hoping to land the video you actually want to watch.
The solution for this time-consuming exercise is to add allintitle: before the keywords you are search for. What it does is basically provide you with only videos that include the chosen keywords.

5. Omit Keywords

You can opt for specific keywords to be in the search, or out of it. Let’s say you are searching for a tutorial about ‘register domain.’ Using the most conventional search form you will find tons of videos about how to register domain using Godaddy.
If you want to find other options that are not GoDaddy, you can always exclude the keyword from your search results i.e. ‘keyword -excluded keyword.’
Here is how it should look like.

6. Speed Checker

The most important race in the world is the red bar and the grey bar. Youtubers know what I am talking about. You can actually check the loading speeds of the video (if it makes you feel better, you know, knowing if the problem is with your connection, or the blasted video) by adding my_speed next to the address of YouTube Home Page.
If you can’t remember the URL extension, right click on any video and head to ‘Take speed test’.
You will get readings of your average video speed based on your location and can even compare speeds based on certain dates.

7. Watching Videos With A Slow Internet Speed

Youtube has released a robust feature called the ‘Feather Beta’. This feature is dedicated to users who want to run videos on a very slow internet connection. The system basically cuts down some bytes that limit the speed of video streaming in your browser.
To opt-in the feature you simply go to http://www.youtube.com/feather_beta and join the beta feature.

Permanently Remove a Photo from iPad & iPhone Instantly

A aspect impact of iOS as well as a very convenient thanks to simply recover deleted photos is that photos aren't fully aloof from associate degree iPhone or iPad now, a minimum of unless the user takes specific action to delete an image for good. That’s what we’re getting to cowl here, in order that if you have got a photograph or several, or a video, that you simply need to for good delete instantly, you won’t got to watch for the automated removal method to finish itself over the course of thirty days (which is however deleting videos / photos works in iOS currently, so providing the recovery feature).

Permanently Delete a Photo or Video from iOS Instantly

This requires iOS 8 or newer, prior versions of iOS do not have this feature:
  1. Delete a picture (or pictures) as usual from the Photos app of iOS – this part is the same
  2. Now go to the Photos app Albums view, and choose “Recently Deleted” – this is the album that allows you to recover photos that were accidentally removed or that you changed your mind about


3.  Use either of the following tricks to instantly delete the photo(s) in question:

    • Delete a single picture by tapping on it, then tapping the “Delete” button
    • Delete multiple photos by choosing the “Select” button, tapping on each specific photo to instantly delete, and then tapping the “Delete” button

4. Confirm that you want to permanently delete a photo by choosing “Delete Photo”

To be completely clear, this simply skips the waiting period to permanently remove the photo from the iOS device. If you delete photos the normal way in iOS it will still remove itself from the device, and it will still be deleted, it’s just that in modern versions of iOS, that removal process takes place over time so that you can optionally recover accidentally deleted pictures and videos from an iPhone, iPad, or iPod touch. Make sense?
Yes it’s a little confusing, but the ability to recover pictures and video you didn’t mean to delete, or changed your mind about, is why this is the way it is, so while some users may think it’s frustrating to have to go through some added steps to instantly delete a photo immediately, the benefits of recovering other pictures without having to use more complex iPhone photo recovery methods greatly outweighs any potential frustration offered by this.

Sunday, December 7, 2014

Microsoft Office Apps for iPhone & iPad

The Microsoft Office suite for iOS

The popular Microsoft workplace suite is on the market as a free transfer for iPhone and iPad homeowners, and also the latest versions now not needs Associate in Nursing Office365 subscription to use, create, and modify documents. The iOS releases of Microsoft Word, Microsoft stand out, and Microsoft Powerpoint ar totally useful for basic tasks, providing a welcome expertise for iPhone and iPad homeowners UN agency admit Microsoft workplace for work, school, or home use. further advanced options may be accessed with a subscription to the workplace 365 service.


Office for iOS needs a Microsoft account to be able to edit and save documents for free of charge, with the choice of saving files to a Microsoft cloud service, DropBox, or regionally onto Associate in Nursing iOS device. language up for a Microsoft account is on the market within the apps, and may conjointly function Associate in Nursing email address, cloud storage, and login to alternative Microsoft services.


The following download links go to the App Store, each respective Office application is a universal app for iPhone, iPad, and iPod touch:
The free iOS versions support functionality that is typical for most users, though advanced features continue to require a paid Office 365 subscription. You can learn more about those specific features which require a subscription here.
The interfaces should be familiar to any Office users, here is Excel:microsoft-excel-iphone
Powerpoint:microsoft-powerpoint-iphone


Word:
microsoft-word-iphone


The Microsoft Office suite is in direct competition with the iWork suite offered by Apple. Though Pages, Numbers, and Keynote are also excellent applications, there are occasional compatibility quirks and issues that can be experienced when working with native Office documents and Word files, sometimes even when specifically exporting as a .doc file from the Pages app. Additionally, many users prefer to use the same software suite across platforms, not only to insure maximum compatibility of files but also to have a seamless experience regardless of they being on an iPhone, iPad, Mac, or Windows PC. An Android version is apparently in the works as well, though it has yet to be released.
As of now, the Office suite remains a paid product for the desktop. Keeping in mind that an iPad or iPhone can use an external keyboard, the free iOS versions of Word, Excel, and Powerpoint offer a compelling option for Apple users who would like to use the Microsoft Office suite.

Five Simple Hacks To Make Windows 8.1 Faster

The release of Windows eight was met with mixed reception; whereas some likable the new interface, there have been others UN agency simply most well-liked its precursor. Microsoft after discharged Windows eight.1, that options many enhancements, a number of that we have a tendency tore lined in an exceedingly post we revealed recently. And to assist you get even a lot of out of this latest giving by Microsoft, we’ve got for you these days five straightforward hacks you'll be able to do to create Windows eight.1 faster.

Windows 8.1

These hacks or tweaks can modify you to try to to things like increasing the speed of sure menus stoning up, obtaining near-instant taskbar icon previews, and switch active windows along with your mouse indicator. All in all, your Windows eight.1 expertise would undoubtedly be drum sander. Most of those hacks need the utilization of Regedit, however fret not, the steps square measure all terribly simple to know. simply note that each one Regedit hacks need you to sign off before taking result.

1. Increase Aero Peek Speed

Aero Peek is a useful feature that lets you see through all your open windows to your desktop as long as your cursor is hovered over the bottom right corner of your screen. By default, there will be a slight delay of about half a second before the desktop is shown. This tweak will remove that delay to instantly show the desktop when your cursor is there.
  1. Go to the Start menu and type in regedit to search for it, then run it.
  2. Navigate to HKEY_CURRENT_USER > Software > Microsoft > Windows > CurrentVersion > Explorer and click on Advanced.
  3. On the right panel, right-click and select New > DWORD (32-bit) Value and name it DesktopLivePreviewHoverTime.
  4. Right-click the newly created registry and select Modify. Choose Decimal and enter a Value Data of 1, which means Aero Peek will activate in 1 millisecond.

2. Increase Taskbar Preview Speed

When you hover your cursor over a taskbar icon, a preview will be shown, thereby enabling you to choose the correct window to navigate to. We’re now going to tweak it so that the preview will come up faster, eliminating the default 1-second delay.
  1. Run Regedit.exe and navigate to HKEY_CURRENT_USER > Control Panel and click on Mouse.
  2. On the right panel, look for MouseHoverTime and right-click to Modify it.
  3. Select Decimal and enter a Value Data of 1, which means when you hover your cursor over a taskbar icon, it’ll take just 1 millisecond for it to show the preview.
Taskbar Preview

3. Increase Context Menu Speed

By default, the context menu will expand when your cursor hovers over it, after a short delay. Applying this tweak will enable Windows to show an expandable context menu faster or almost instantly whenever your cursor hovers over it.
  1. Run Regedit.exe and navigate to HKEY_CURRENT_USER > Control Panel and click on Desktop.
  2. On the right panel, look for MenuShowDelay and right-click to Modify it.
  3. Select Decimal and enter a Value Data of 1, which means when your cursor hovers over an expandable context menu, it’ll take 1 millisecond for it expand.
Context Menu

4. Switch Active Windows With Mouse Cursor

In the Ease of Access Center, there’s a feature that allows you to activate a window by hovering over it with the cursor. This allows users to view all their open windows swiftly without the need for clicking the mouse. This feature is especially handy for trackpad users as they won’t have to tap on their trackpad to activate a window in the background. A simple Regedit hack can also increase or shorten the delay when activating windows. To do this,
  1. Run Regedit.exe and navigate to HKEY_CURRENT_USER > Control Panel and click on Desktop.
  2. On the right panel, right-click on ActiveWndTrkTimeout and select Modify.
  3. Select Decimal and change the Value Data to something you’re comfortable with. The number you enter is calculated in milliseconds.
Hover Activate Windows

5. Disable Time-Wasting Animations

Both Windows 8 and 8.1 come with many animations that make transitions and everything else look beautiful. However, these animations not only eat into your computer’s performance, but also take extra milliseconds to complete. Here’s how to disable them completely.
  1. Open up File Explorer and right-click anywhere in the window and select Properties.
  2. On the left panel, click on Advanced system setting and under the Performance subtitle, click on Settings.
  3. You’ll then see the Performance Options with all the animations you can disable. For the best performance, uncheck all of them.
Your system will look less posh, but it’ll surely work lightning fast.
Performance Options